Thursday, November 30, 2006

Learning about the Lathe - part 3 - Getting it together


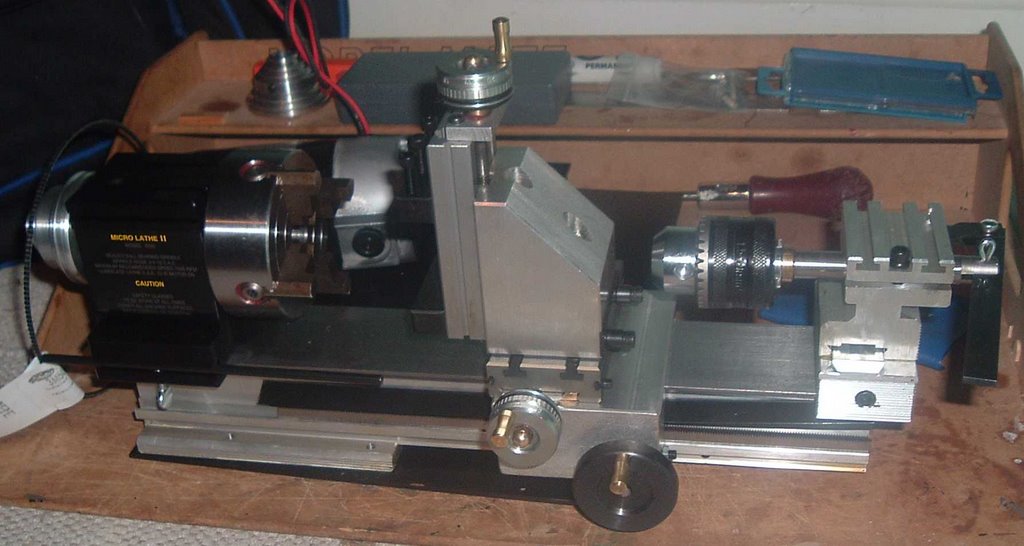
There you are - the beast assembled and shining for albeit without power and with everything I could manage attached in a totally none practical way.This part will go through some of the components and explain why I chose them, and how they all piece together.


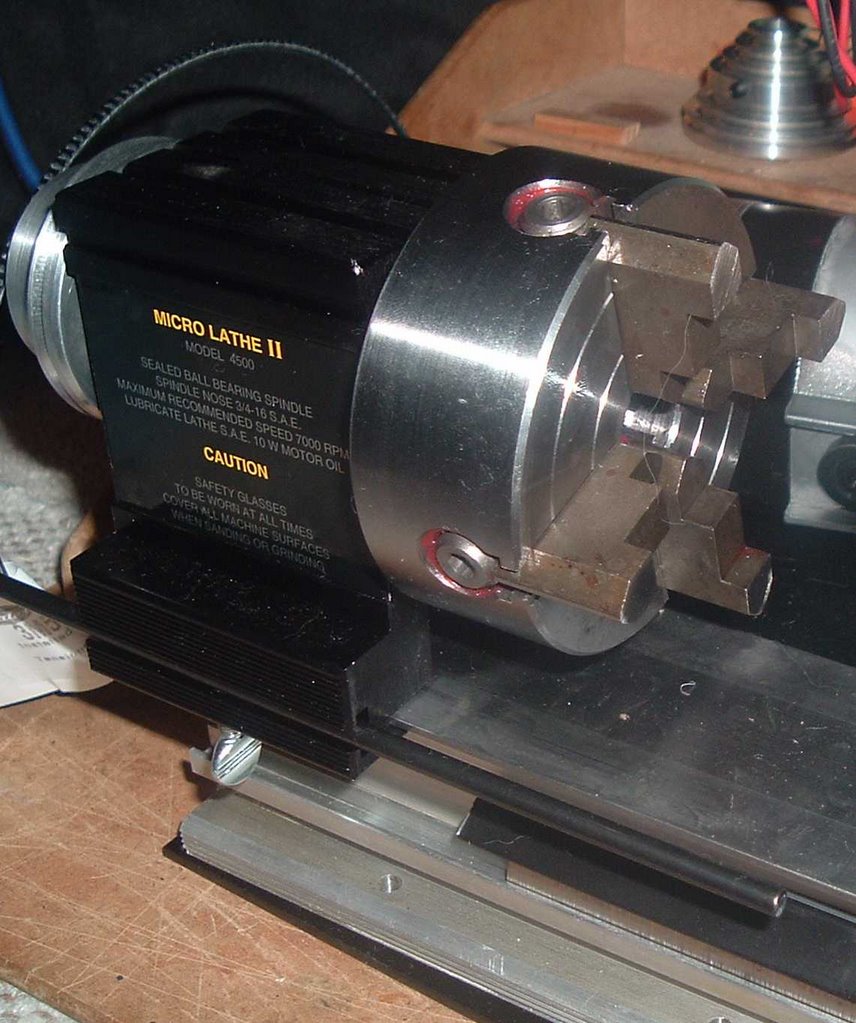
Firstly the chuck - I have gone for a 4 jaw chuck - the chuck holds the work that spins around and whilst a four jaw is harder to set up precisely - each jaw being independent, it is far more flexible in that it can hold square and irregular stock as well as bars. One further accessory required as a result of this decision will be a dial gauge that helps you work out when you work is centred in the chuck. More good advice came recommending that a set of collets would be advisable to hold rods as they allow you to hold the rods centred, very precisely without too much messing around. Peatol sell a set of 7 plus a blank one to allow you make your own size up. The collets fit onto the headstock spindle, which means the chuck has to be removed - so you will need the spanner offered by Peatol!


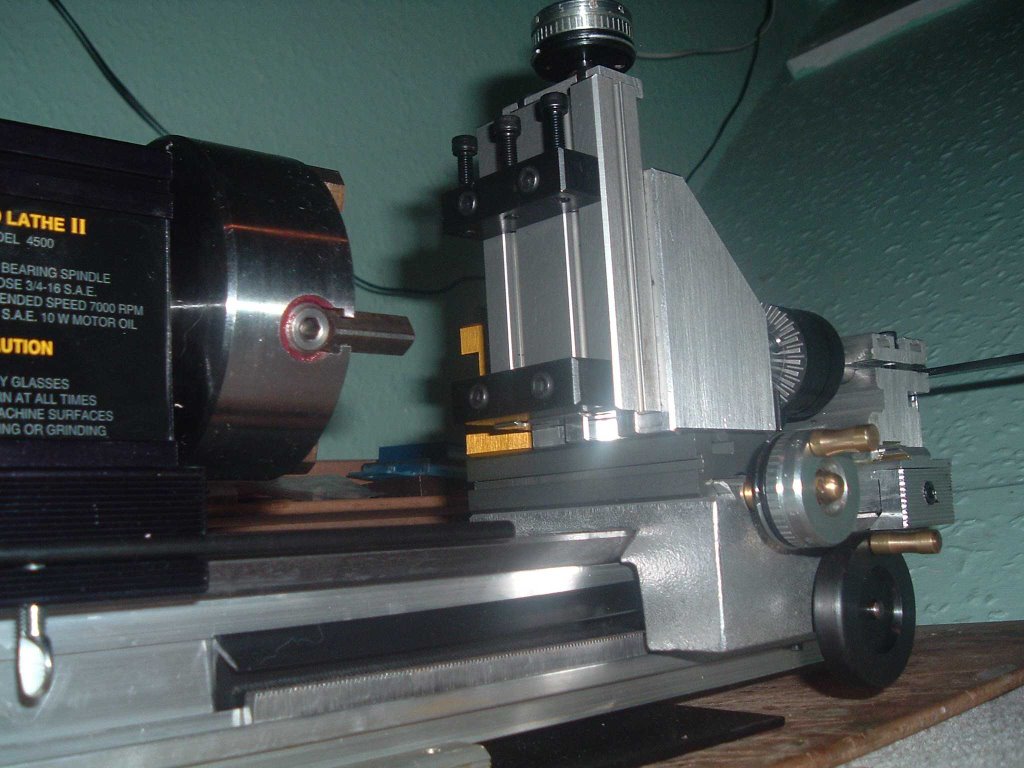
This next contraption is the vertical slide - mounted here on the cross slide, which between them allow you to do basic milling work on the lathe. In short the tool is mounted on the headstock spindle (as above) and rotates, while you move the work using one of the two wheels on the slides, taking a small shaving off the work in one plane. This is a much cheaper option than a milling machine!

At the other end of the lathe - the tailstock - is the drilling attachment with a jacob's chuck attacked to the spindle. The Peatol has a lever that allows you to push the drill towards the spinning work held in the headstock collet or chuck. Neat isn't it? There are 2 chucks needed to cover the range of bit sizes.

Also there are a toolpost - to hold the cutting tools - 1/4 inch size or 6mm (?) shanks are the thing, pullies, a mounting plate and assorted allen keys.

When the parcel arrives, expect to have to spend some time assembling everything - the Peatol also requires that the main components are lapped onto the bed - a messy business involving an oily paste which is then all washed off. This is well covered in both the book and the instructions that come with the lathe. The other prerequisite is somewhere to keep everything - not just a site for the lathe, but somewhere clean and organised to keep all the allen keys, spanners, drills, cutting tools, chucks, spare belts, collets etc. etc.

In part 4 I'll discuss setting the lathe up and motor and whatever else happens along the way!


Tuesday, November 28, 2006

Learning about the Lathe - part 2 - What do I need?

Having made the decision to jump in and buy a lathe, the next question is which lathe? Your answer to that question may well be different to mine, and will largely depend on what you intend to do with the lathe when you get it. For me the requirement is to be able to produce live steam locomotives to run on 32mm gauge track out in my garden. These locomotives will most likely be constructed from plans available from the hobby's several magazines and/or via the internet. There is a good community around this branch of the hobby and that is a bonus where we are concerned, because there is no better advice available than from those that have either built one or more of these locos before, or, and this is even better, designed the thing in the first place! Lesson one for this part is that contrary to my expectations, these people are not inaccessible, aloof or distant, quite the reverse in fact, show a little enthusiasm for the subject and you will find yourself showered with offers of help, advice and patience. Ask them anything, and you will get an answer, or two, or three .... but you will get help, however basic or complex your question. There's a set of addresses for my main sources of advice at the end of this article.

I ended up buying a Peatol (Taig in the USA) micro lathe - there were some good reasons for choosing this model outlined below:
  1. Having read around the subject for a while, it transpired that Keith Bucklitch, who designed many of the locos I hope to build, uses one for much of his building work. You can't really ask for a better indication of "Fit for purpose" than that. Keith has also been a great source of advice and help already.
  2. There is a good, separate, Peatol enthusiast community on the internet.
  3. I was able to purchase a 2 hour long DVD showing a Peatol being put through it's paces, mostly while the guy held the camera in one hand and operated the lathe with the other.
  4. The lathe has been around for years and is well proven.
  5. The Chinese import machines appear to be much improved, but not always as well made as I'd like. This is anecdotal, but we're talking about major expenditure here and quality counts.
  6. The modular design and easy availability of parts (and probably spares). I am very impressed by the next day delivery service available from Peatol.
  7. A good variable speed DC motor is available as an alternative to the standard offering (which you don't have to buy)

There are probably other reasons too, but that will do for now. In part three I'll discuss the parts list, tools and there will be some picture of a nice shiny new lathe - promise!


Advice and help lines:

Yahoo, for all their foibles, do offer a fairly good egroup network, and one account can give you access to an awful lot! My most used are:

http://groups.yahoo.com/group/modelloco16mm/ Bob Young runs this group specifically for those of us building these locos and I am indebted to the members for their help, advice and offers of equipment and guidance.

http://groups.yahoo.com/group/16mmngm a more general place for all things 16mm scale.

http://groups.yahoo.com/group/7-8InchScaleTrains is a similar group for the larger scale, but still able to use 32mm gauge track.

Other useful sites:

http://www.cartertools.com/ for access to all manner of Peatol (Taig) based sites - some people have done amazing things with their little lathes and it's all here.

http://www.peatol.co.uk/
the place to spend your money in the UK!

Monday, November 27, 2006

Learning about the Lathe - part 1 - Starting out


I have just purchased a small - indeed micro - lathe to facilitate my building small live steam locomotives for use on my 32mm gauge garden railway. The period of time that elapsed between my deciding that I needed (and could afford) a lathe and actually ordering one (which arrived the very next day!) was really quite long, and one of the reasons for this was the lack of basic information and advice in any one place. This article sets out to rectify this situation, and bring together some of the information and advice that I accumulated as I went along my road to discovery.

First though, by way of preamble, a little background. I am, as I write, 45 years old. I have had no experience in metal turning since I left school with a GCE in metalwork at the age of 17, so I am in no sense of the word an expert. I have long harboured the desire to build working steam locos, that GCE was inspired by the model beam engine on display in the school workshop, but so far my albeit limited attempts at building locos have all been electric powered and kit based. Similarly my garden railway has been on the to do list for years, and has only recently become a reality, with a great of work still to do before it can claim to be even remotely complete, but, and this is the nub - I HAVE built it - I DO have a 50m continuous run of track that I can run trains around. It is achieving this goal that has spurred me on to the next one. Too long have I sat reading about other people building locos in their garages, my mind set firmly in the mould of "wow - I'll never be able to do that - they must be so clever." Overcoming this inertia is one of the hardest bits - and it took a fairly traumatic period in my life to jolt me out of that inertia mode and to decide to just get on with it, after all I had just built a garden railway, and there have been many occasions when I felt that would never happen!

Anyway, that's enough philosophy, the next hardest part, having decided to start out, is to finance the project, and there you are on your own! Suffice to say that starting from nothing has set me back about £750 so far, with a little more to spend in the coming months. So budget around that figure if you intend to buy all new equipment and tools as I did. I plumped for new stuff because frankly, while there are plenty of second hand lathes on the market, without the experience to assist, how could I tell whether they were any good - and what worse way to start than with a bent lathe? If this sounds a lot, let me put it into perspective - I would like to purchase a coal powered live steamer - these a currently starting at about £2000, and the one I want is 2.5 times that amount! The cheapest live steam (Mamods excluded) start at about £500. If all goes to plan, then without spending much more than a few quid for materials ( I have included my initial stock in my budget), I hope to be able to produce a couple, maybe three or 4 locomotives in the time I may be waiting for a coal burner to be made - thereby "saving" myself at least £500 for each one - and probably more in reality. My time is free, even though my free time is priceless! Then of course, there is the satisfaction of watching your new creation chuffing peacefully around the track while you watch with a huge grin and tell everyone in earshot, over and over again -"I made that! Look! Look at that! I made it!"

Are you ready to join me on this voyage then? In the next article I'll cover how I arrived at my final specification, and answer some of those simple questions that I had to ask first. In the meantime, I am only just setting out myself, my lathe hasn't been powered up yet, and I still have many unanswered questions myself.

All aboard!

Saturday, November 18, 2006

Irish American


I keep a folder full of images from the web that I use as inspiration for our own railway, and one of the most regular contributers to the folder is Matthew Labine with his West Clare Garden Railway - Matthew is treading a similar path to me so far as rolling stock is concerned, except that he is cheating, using plans and building stuff to the correct scale/gauge and so on.

Matthew is based "over there" in the US of A, but has a little slice of Ireland out there in his garden.

Sunday, November 05, 2006

Fireworks for New Link!

How appropriate that the whole nation is currently setting off fireworks and lighting great bonfires! Can it all be to celebrate the completion of our continuous circuit of track? I guess not, but there is an air of celebrario here and the two pictures below will show why:


This action shot shows "Jesty" just coming off the new link in the background. These last few yards of track mean that the old circuit is now converted into a loop and provides us now with a continuous run of some 50 yards or so. To the left is one of the newly planted Lonicera bushes that will form semi-scale trees alongside the line once established.


Here is a general view of the link snaking under the jasmin and behind the conifer to join the old circuit beyond the tree.

We're by no means finished , but it feeld good to be able to run a train right round after so much work!


And here is some of this week's work - the new raised section looking up the garden with the woodwork retaining walls and the planting done.


The same section looking down the garden. Our local plant purveyor was having a sale this week so week managed to get a lot of small conifers and dome thyme and other alpines quite cheaply.


Gentiana planted lineside. Only half of the raised section has been finished to this standard so far - and none of the track has been ballasted yet. I'm going to use "Rowlands mix" for this when the time comes because is will allow me to sweep the leaves off the track - a problem for all sizes of railway this time of the year.


Driver's eye view of the raised section.